Section 1 - The 3CX desktop app
Section 2 - The 3CX app for windows & the 3CX web client
Section 1 - Recording Voicemail on the 3CX Desktop App

4) Give your new Greeting a name (if you are going to be setting a universal voicemail regardless of your status, you can just name this "Jacks Voicemail", if you're going to have a voicemail depending on if you're status is set to busy or away, name it "Jack's busy voicemail" or "Jacks away voicemail")
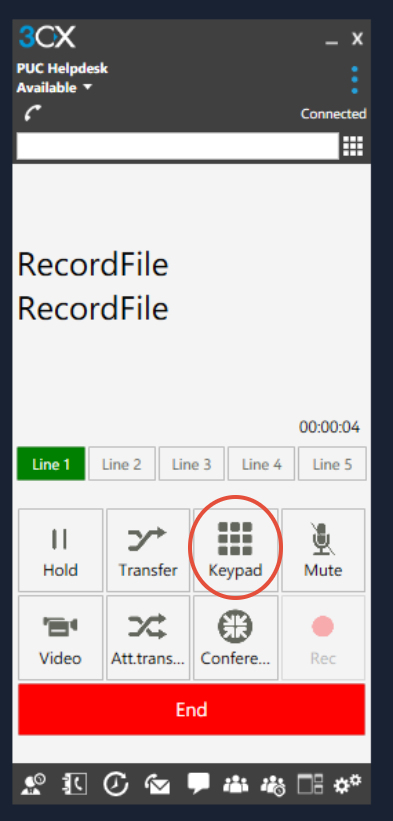
5) Once you have recorded your message, click the keypad option circled below to be able to click £ or # as applicable, followed by 0 to save the message:

6) If you have recorded a generic voicemail to be used across all statuses, you now simply click the drop down menu on default and select your new audio file, if you are recording custom voicemails per status, simply choose the drop down menu of the applicable status to choose your prompt:
Section 2 - Recording Voicemail on the 3CX App for Windows & the 3CX web client
1) Select the 3 dots on the left hand side of your 3CX App for windows or the 3CX weblcient, and then choose settings:

2) Choose Greetings from the left hand side of your screen

3) Click Record Greeting:

4) Give your new Greeting a name (if you are going to be setting a universal voicemail regardless of your status, you can just name this "Jacks Voicemail", if you're going to have a voicemail depending on if you're status is set to busy or away, name it "Jack's busy voicemail" or "Jacks away voicemail")

5) A call will then be initiated from 3CX to your extension, accept this call:

6) Once you have recorded your message, click the keypad option circled below to be able to click £ or # as applicable, followed by 0 to save the message:

7) If you have recorded a generic voicemail to be used across all statuses, you now simply click the drop down menu on default and select your new audio file, if you are recording custom voicemails per status, simply choose the drop down menu of the applicable status to choose your prompt:
Found a problem with this article? Please let us know.
